Mailboxes for Receiving Observables
Mailboxes enable you to ingest data to ThreatStream via email, without connecting to the user interface. These emails must be sent to designated mailboxes on ThreatStream, which are associated with unique email addresses.
There are two types of mailboxes on ThreatStream.
- Phishing mailboxes enable you to forward phishing scams you receive to ThreatStream for analysis. These mailboxes can be configured to create an import session for observables parsed from the email or an investigation from which you can centrally manage the analysis process. The investigation will contain all discovered observables from the email, for which you can initiate an import session from the investigation. You can additionally configure phishing mailboxes to create Threat Bulletins from the email content and detonate URLs or attachments in the sandbox.
- Import mailboxes enable you to initiate import sessions for structured or unstructured data without connecting to the ThreatStream user interface. You can additionally configure import mailboxes to add imported observables to new investigations and create Threat Bulletins for each import.
Any ThreatStream user can create multiple mailboxes to meet their needs. For example, you can set up one mailbox to submit the phishing attachments to Sandbox and another one to create a Threat Bulletin when phishing emails are received.
(Click the image to enlarge it.)
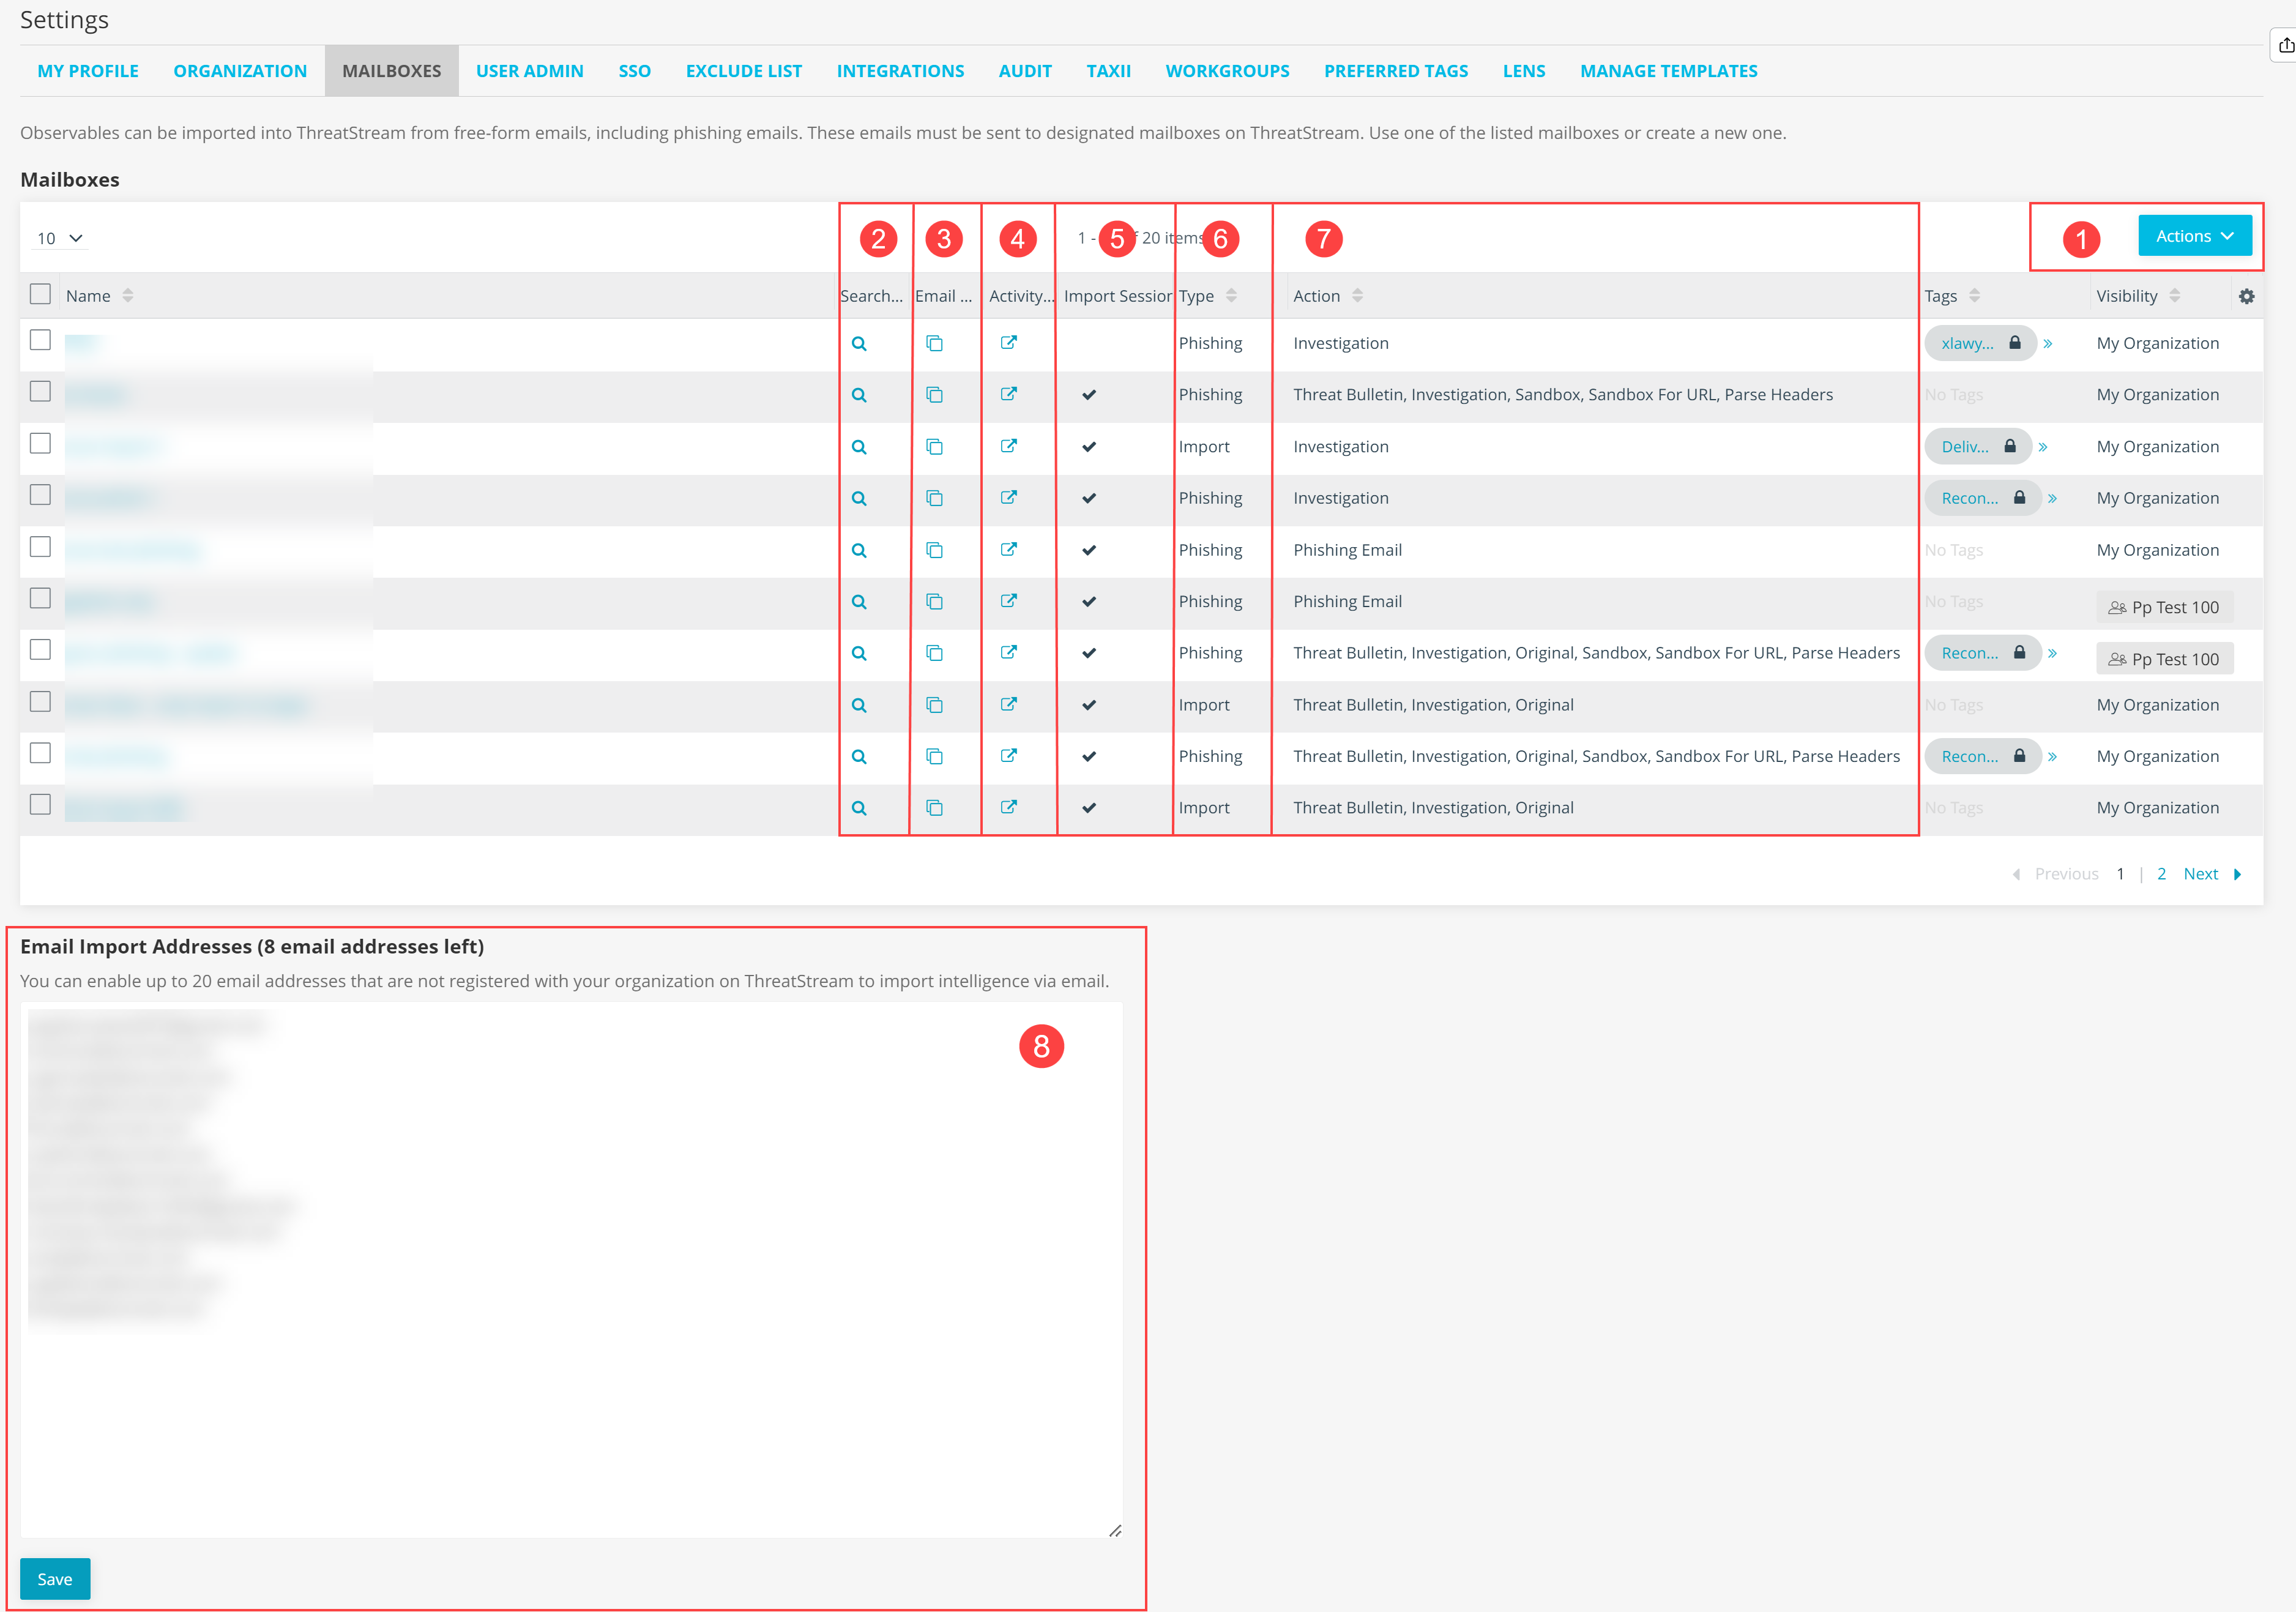
 Actions:
- Add—create a new mailbox.
- Edit—edit the selected mailbox.
- Delete—delete the selected mailbox.
 View observables imported via the mailbox on the Observables search page.
 Copy the email address associated with the mailbox.
 View status of import jobs submitted via the mailbox and access any associated import sessions, investigations, or Threat Bulletins.
 Whether or not an import session is automatically created when the mailbox receives submissions.
 Type of mailbox—Import or Phishing.
 Actions associated with the mailbox.
 Enable up to 20 email addresses not registered with your organization to import intelligence via email. See Adding Additional Email Import Addresses for more information.
Managing Mailboxes
To add phishing mailboxes:
- In the bottom-left corner of the side navigation panel, click
 > ThreatStream and then click Mailboxes.
 - Click Add in the Actions menu.
-
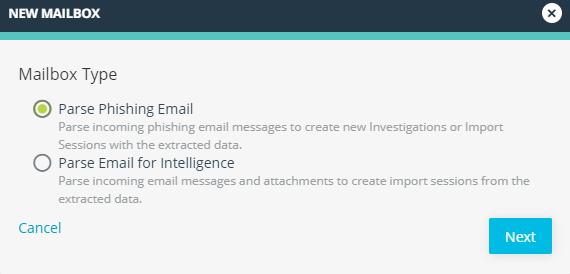
Select Parse Phishing Email and click Next.
-
Configure the following mailbox settings:
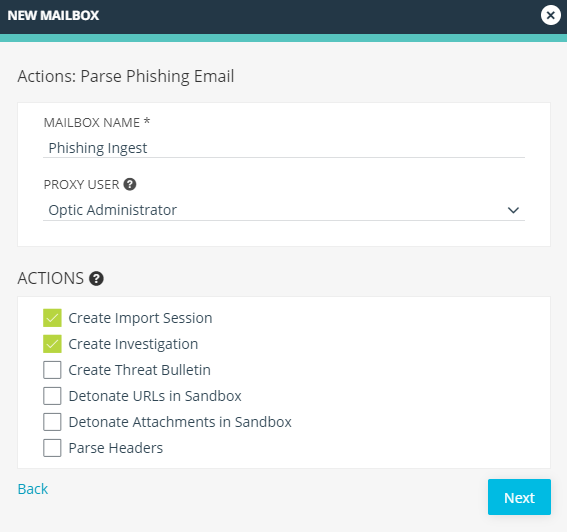
Setting Description Name A meaningful name for the mailbox. Proxy User When submissions are received from email addresses that are not registered with your organization, this user is listed as the creator of any resulting import sessions, investigations, or Threat Bulletins.
Actions Automatic actions that ThreatStream will take when an email is received by the mailbox.
- Create Import Session: An import session is created for observables parsed from the phishing email.
-
Create an Investigation: An investigation is created. Email contents are added to the Investigation. The user you select under Assignee below is made reporter for the investigation.
Note:
-
You must select Create Import Session, Create an Investigation, or both.
-
If you select Create an Investigation only, an import session is not initiated when the mailbox receives submissions. Parsed observables which have already been imported to ThreatStream are added to the investigation as Already Imported Observables. Parsed observables which do not exist in ThreatStream are added to the Investigation as Not Imported Observables. In these cases, global and organization exclude lists are not applied to candidate observables until they are imported. Hence, observables present on your organization Import Exclude List can be added to the investigation as Not Imported Observables.
-
-
Create Threat Bulletin: Create a Threat Bulletin with the contents of attached phishing emails. The user you select under Select Reporter/Assignee is assigned the Threat Bulletin. Typically, in the context of Threat Bulletin created via phishing email mailboxes, default assignees triage newly created Threat Bulletins and route them to other users for review. See Phishing Email Threat Bulletins for more information. Select Attach Original Email if you want to make the original email available in the Attachments section of the Threat Bulletin.
Note: Upon creation, Threat Bulletins are assigned the New status and only visible to your organization. See Reviewing Threat Model Entities for Publication for more information on the Threat Model publication workflow. -
Detonate URLs in Sandbox: Submit parsed URLs to the sandbox for detonation. When you select this option, you can also specify a Sandbox Service and Platform on which to detonate the URLs.
Notes:
-
Sandbox imposes a restriction of a maximum of 1024 characters on URLs. Therefore, make sure the URLs adhere to this limit.
-
Only the first five parsed URLs are submitted to the sandbox.
-
-
Detonate Attachment in Sandbox: Submit email attachments to the sandbox. When you select this option, you can also specify a Sandbox Service and Platform on which to detonate the attachment.
Notes Password protected attachments are not supported for detonation through phishing mailboxes. - Parse Headers: When this option is selected, ThreatStream parses the headers of emails received by the mailbox. Observables parsed from the email headers are included in the import session associated with the ingestion. Additionally, email headers are included alongside email bodies in Threat Bulletins or investigations that result from the ingestion. Email headers will be ignored by ThreatStream if this option is not selected.
-
Click Next and configure the following Additional Settings:
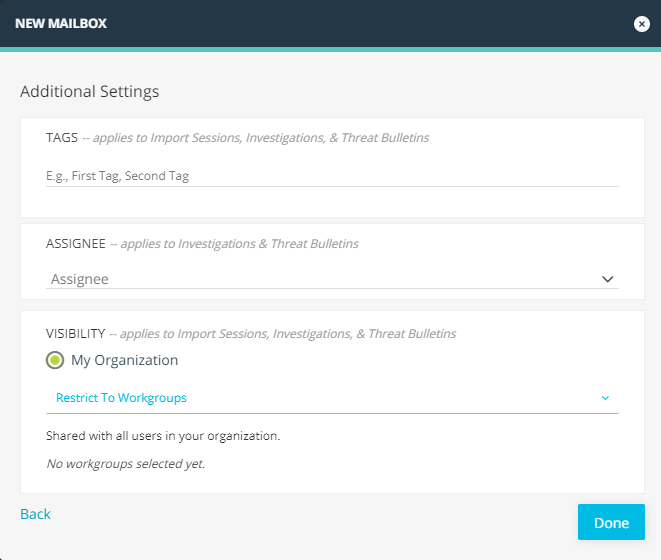
Setting Description Tags (Optional) Add any Tags that you want to associate with the imported intelligence. Tags can contain spaces. You can also select pre-defined tags from the Add Kill Chain Phase drop down. If you are specifying multiple tags, comma-separate the tags.
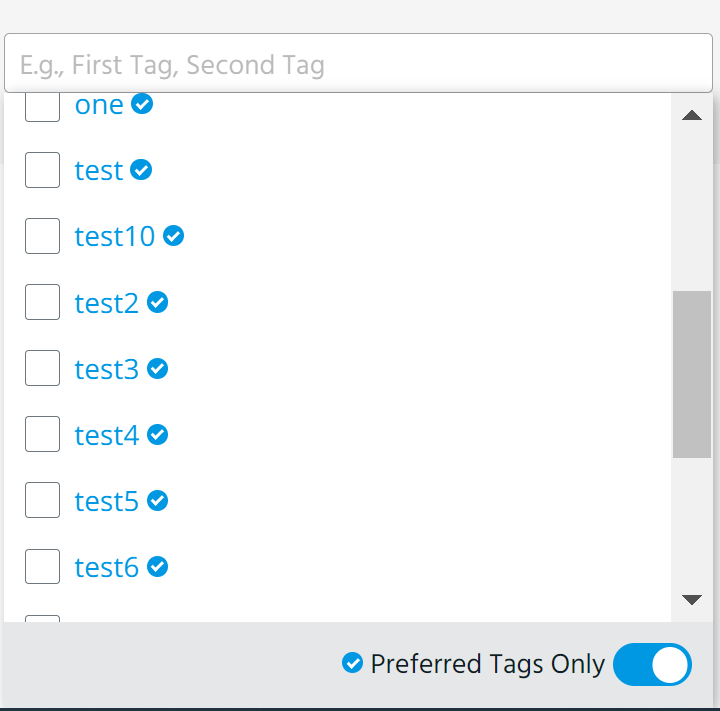
As you type the first few characters of the tag, the 20 most used tags in your organization from the previous seven days are displayed. Enable the Preferred Tags Only toggle to display and search though only the list of preferred tags. Alternatively, enter * to display preferred tags.
Assignee Organization user to which investigations and Threat Bulletins will be assigned. Visibility
You can restrict the visibility to specific workgroups in your organization. To do so, select the workgroups to which you want to give exclusive access to the observables imported through the mailbox. For more information on workgroups, see Restricting Access to Intelligence with Workgroups .
Note: For mailboxes configured to share import sessions or investigations with workgroups, submissions made from email addresses outside of your organization fail if the configured Proxy User is not a member of the workgroup. -
Click Done.
The mailbox is added to the list on the Mailboxes screen. If you want to copy the email address of this mailbox, click
 in the Email column. The address is copied to the copy buffer. You can paste this email address in a mail client of your choice to send an email to ThreatStream.
To add import mailboxes:
- In the bottom-left corner of the side navigation panel, click > ThreatStream and then click Mailboxes.
- Click Add in the Actions menu.
-
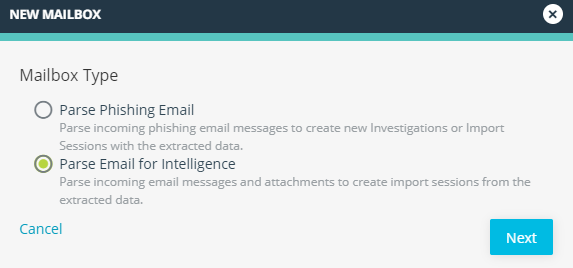
Select Parse Email for Intelligence and click Next.
-
Configure the following mailbox settings:
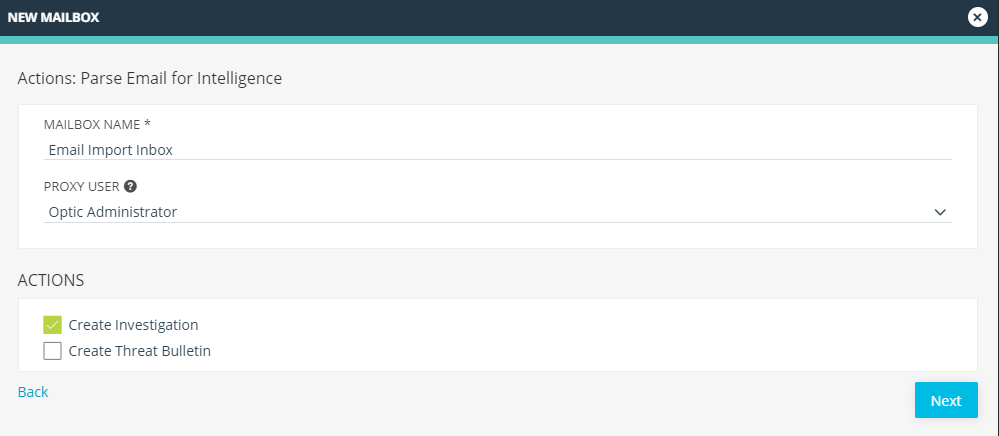
Setting Description Name A meaningful name for the mailbox. Proxy User When submissions are received from email addresses that are not registered with your organization, this user is listed as the creator of any resulting import sessions, investigations, or Threat Bulletins.
Actions Automatic actions that ThreatStream will take when an email is received by the mailbox.
Notes: All Import mailboxes create import sessions for observables parsed from the bodies of submitted emails. You can select any of the following actions in addition to this primary action.-
Create an Investigation: An investigation is created. Email contents are added to the Investigation.
- Create Threat Bulletin: Create a Threat Bulletin with the contents of the emails. Select Attach Original Email if you want to make the original email available in the Attachments section of the Threat Bulletin.
-
-
Click Next and configure the following Additional Settings:
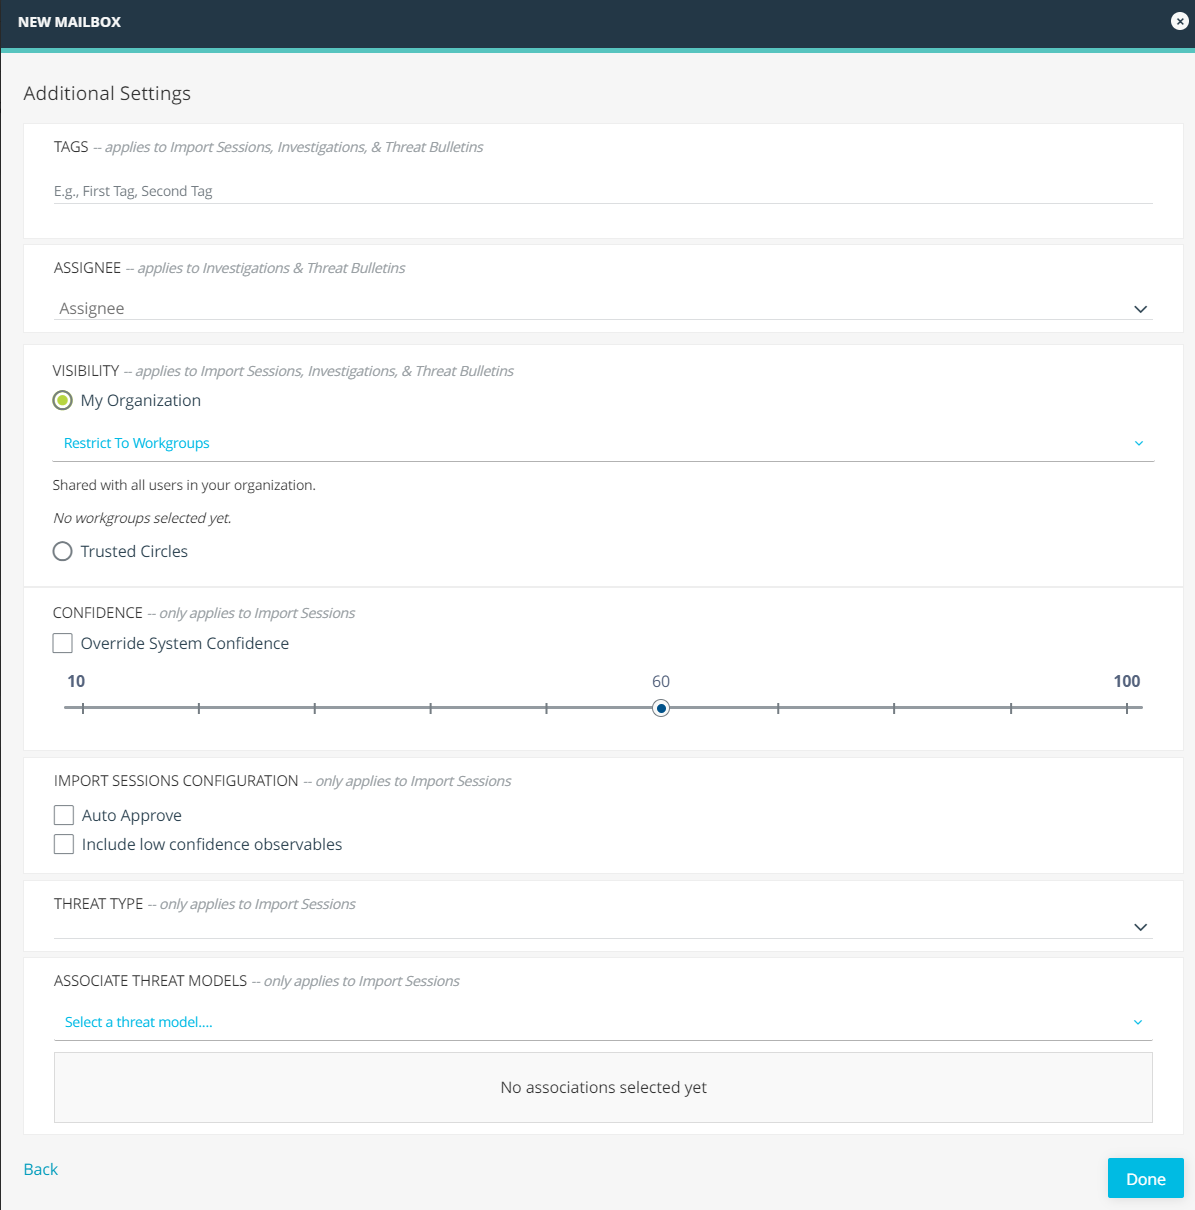
Setting Description Tags (Optional) Add any Tags that you want to associate with the imported intelligence. Tags can contain spaces. You can also select pre-defined tags from the Add Kill Chain Phase drop down. If you are specifying multiple tags, comma-separate the tags.
As you type the first few characters of the tag, the 20 most used tags in your organization from the previous seven days are displayed. Enable the Preferred Tags Only toggle to display and search though only the list of preferred tags. Alternatively, enter * to display preferred tags.
Assignee Organization user to which investigations and Threat Bulletins will be assigned. Visibility
Select a Visibility setting for import sessions created through the mailbox— My Organization or Trusted Circles.
Note: The Anomali Community Visibility setting, which was previously available for import mailboxes, is no longer supported. Effective April 14, 2023.If you select Trusted Circles, check the Trusted Circles from the provided list.
If you select My Organization, you can further restrict the visibility to specific workgroups in your organization. To do so, select the workgroups to which you want to give exclusive access to the observables imported through the mailbox. For more information on workgroups, see Restricting Access to Intelligence with Workgroups .
Investigations and Threat Bulletins created through import mailboxes are always assigned the My Organization visibility setting.
Confidence
Select the Confidence value you want to assign to the imported observables.
The Confidence value is re-assessed when ThreatStream analyzes the imported data. To enforce the Confidence value you have selected, check Override System Confidence.
Import Sessions Configuration Select configuration options for mailbox import sessions—Auto Approve and Include low confidence observables.
When Auto Approve is selected, the intelligence import initiated from the import mailbox will be auto approved.
Note: You must have Approve Intel privileges to auto-approve import sessions.When Include low confidence observables is selected, low confidence intelligence (<30) will be added to import sessions initiated from the import mailbox.
Threat Type Threat Type for the imported observables. ThreatStream will assign extracted observables an indicator type based on the threat type you specify.
Malware is the default threat type. Imported observables will be assigned a Malware related indicator type if you do not select a different threat type.
See Threat Types in ThreatStream for more information.
Associate Threat Models
Associate observables with threat model entities. Select the threat model entity type—Actor, Campaign, Incident, Threat Bulletin, TTP—and its name. -
Click Done.
The mailbox is added to the list on the Mailboxes screen. If you want to copy the email address of this mailbox, click
in the Email column. The address is copied to the copy buffer. You can paste this email address in a mail client of your choice to send an email to ThreatStream.
To edit a mailbox on ThreatStream:
- In the bottom-left corner of the side navigation panel, click > ThreatStream and then click Mailboxes.
- Click the mailbox you want to edit OR select the mailbox and click Edit under Actions.
- Make the required changes.
- Click Save.
To delete a mailbox on ThreatStream:
- In the bottom-left corner of the side navigation panel, click > ThreatStream and then click Mailboxes.
-
Select the mailboxes you want to delete.
- Select Delete from the Actions drop-down list.
Adding Additional Email Import Addresses
By default, only email addresses registered with your organization on ThreatStream can import intelligence via organization mailboxes. However, you can enable up to 20 email addresses not registered with your organization to submit intelligence to your mailboxes. Only Org Admins can add additional email import addresses.
To add additional email import addresses:
- In the bottom-left corner of the side navigation panel, click > ThreatStream and then click Mailboxes.
- Under Email Import Addresses, add up to 20 email addresses not registered with your organization. Enter one email address per line.
- Click Save.